

Unity UI Optimization Workflow: Step-by-Step full guide for everyone
A complete guide to optimizing interfaces on Unity

🤔 My name is Elijah, I've been working in the game development industry for more than 10 years and I love to solve various problems related to my field.
🔭 My main tool as a person working with both mobile and console games is of course Unity.
⚡I also worked with WebGL and used mostly C# or NodeJS as a server language. I would be glad to share my experience - you can always write to me in Discord (SodaBoom).
Hey, everybody. Probably all of you have worked with interfaces in your games and know how important it is to take care of their optimization, especially on mobile projects - when the number of UI elements becomes very large. So, in this article we will deal with the topic of UI optimization for your games. Let's go.
A little bit about Unity UI
First of all, I would like to make it clear that in this article we will cover Unity UI (uGUI) without touching IMGUI and UI Toolkit.
So, Unity UI - GameObject-based UI system that you can use to develop runtime UI for games and applications. And everything about optimizing objects and their hierarchy is covered under Unity UI, including MonoBehaviour.
In Unity UI, you use components and the Game view to arrange, position, and style the user interface. It supports advanced rendering and text features.
Prepare UI Resources
You know, of course, that the first thing you should do is to prepare resources for the interface from your UI layout. To do this, you usually either use atlases and slice them manually, or combine many elements into atlases using Sprite Packer. We'll look at the second option of resource packaging - when we have a lot of UI elements.

Altases

When packing your atlases, it's important to remember - that you need to do it thoughtfully and not pack an icon into a generic atlas if it's going to be used somewhere once, with it needing to pad the entire atlas. The option of leaving the packing automatically to Unity's conscience does not suit us as well, so I advise you to follow the following rules for packing:
Create a General Atlas for elements that are constantly used on the screen - for example, window containers and other elements.
Create Separated combined small atlases for every View;
Create Atlases for icons by category (for example HUDIcons);
Don't manually pack large elements (like header images, loading screens);
Don't manually pack in infrequent on-screen elements - leave that to Unity;
Texture Compression

The second step is to pick the right texture compression and other options for this. Here, as a rule, you proceed from what you need to achieve, but leaving textures without compression at all is not worth it.


What you need to consider when setting up compression:
Disable Generating of Physics Shapes for non-raycastable elements;
Use only POT-textures (like 16x16, 32x32 etc);
Disable alpha-channel for non-alpha textures;
Enable mip-map generation for different quality levels (for example for game quality settings. It's reduce vRAM on low game quality settings, but increase texture size in build);
Change maximal texture size (expect on mobile devices);
Don't use full-blown interface elements - create tiles;
Play with different compression formats and levels;
Canvases Optimizing
The Canvas is the area that all UI elements should be inside. The Canvas is a Game Object with a Canvas component on it, and all UI elements must be children of such a Canvas.
So, let's turn our attention to what you need to know about Canvas:
Split your Views into different Canvas, especially if there are animations on the same screen (When a single element changes on the UI Canvas, it dirties the whole Canvas);
Do not use World View Canvases - position objects on the Screen Space Canvas using Camera.WorldToViewportPoint and other means;
UI elements in the Canvas are drawn in the same order they appear in the Hierarchy. Take this into account when building the object tree - I wrote about it next;
Hide other canvases when full-screen canvas is opened, because Unity render every canvas behind active;
Disable canvas with enable property, not by disabling Game Object, where is possible;
Each Canvas is an island that isolates its elements from those of other Canvases. Take advantage of UGUI’s ability to support multiple Canvases by slicing up your Canvases to solve the batching problems with Unity UI.
You can also nest Canvases, which allows designers to create large hierarchical UIs, without having to think about where different elements are onscreen across Canvases. Child Canvases also isolate content from both their parent and sibling Canvases. They maintain their own geometry and perform their own batching. One way to decide how to split them up is based on how frequently they need to be refreshed. Keep static UI Elements on a separate Canvas, and dynamic Elements that update at the same time on smaller sub-Canvases. Also, ensure that all UI Elements on each Canvas have the same Z value, materials, and textures.
Tree Optimizing
Since canvas elements are rendered in tree mode - changing the bottom element redraws the entire tree. Keep this in mind when building the hierarchy and try to create as flat a tree as possible, as in the example below:

Why is necessary?
Any change to the bottom element of the tree will break the process of combining geometry - called batching. Therefore, the bottom element will redraw the whole tree if it is changed. And if this element is animated - with a high probability, it will redraw the whole Canvas.
Raycasting
The Raycaster that translates your input into UI Events. More specifically, it translates screen clicks or onscreen touch inputs into UI Events, and then sends them to interested UI Elements. You need a Graphic Raycaster on every Canvas that requires input, including sub-Canvases. However, it also loops through every input point onscreen and checks if they’re within a UI’s RectTransform, resulting in potential overhead.
Despite its name, the Graphic Raycaster is not really a raycaster. By default, it only tests UI graphics. It takes the set of UI Elements that are interested in receiving input on a given Canvas and performs intersection checks. For instance, it checks if the point at which the input event occurs against the RectTransform of each UI Element on the Graphic Raycaster’s Canvas is marked as interactive.
The challenge is that not all UI Elements are interested in receiving updates. But Raycast Target checks for click every frame!
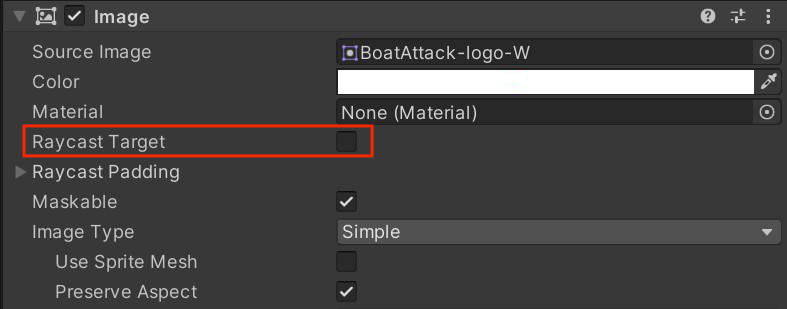
So, solution for limit CPU usage for your UI - limiting of Raycasters at your UI Elements. Wherever you don't need to detect clicks on a UI element - disable Raycast Target. After that you may be surprised at how performance will improve, especially on large UIs.
Image Component and Sprites
So, our Canvas has a huge number of different Image components, each of which is configured by default not to be optimized, but to provide the maximum pool of features. Using them as they are is a bad idea, so below I've described what and where to customize - this will work great in combination with texture compression and atlases, which I wrote about above.

General Tips for Image Component:
Use lightweight, compressed sprites, not full images from your UI Mockup;
Disable Raycast Target if you don't need to check clicks for this element;
Disable Maskable if you don't use masks or scrollviews for this element;
Use Simple or Tiled image type where possible;
Do not use Preserve Aspect where possible;
Use lightweight material for images, do not leave material unassigned!
Bake all background, shadows and icons into single sprite if it possible;
Do not use masking;
Text Optimizing
Text optimization is also one of the most important reasons why performance can be degraded. First of all, don't use Legacy Unity UI Text - instead, use TextMeshPro for uGUI (it's enabled by default in recent versions of Unity). And next, try to optimize this component.

General Tips for TextMesh Optimization:
Do not use dynamic atlases. Use only static.
Do not use text effects. Use a simple shaders and materials for text.
Do not use auto-size for text;
Use Is Scale Static where possible;
Do not use Rich Text;
Disable Maskable for non-masking text and outside scroll views;
Disable Parse Escape Characters where possible;
Disable Raycast Target where possible;
Masks and Layout Groups
When one or more child UI Element(s) change on a layout system, the layout becomes “dirty.” The changed child Element(s) invalidate the layout system that owns it.
A layout system is a set of contiguous layout groups directly above a layout element. A layout element is not just the Layout Element component (UI images, texts, and Scroll Rects), it also comprises layout elements – just as Scroll Rects are also layout groups.
Use Anchors for proportional layouts. On hot UIs with a dynamic number of UI Elements, consider writing your own code to calculate layouts. Be sure to use this on demand, rather than for every single change.
About Lists, Grids and Views
Large List and Grid views are expensive, and layering numerous UI Elements (i.e., cards stacked in a card battle game) creates overdraw. Customize your code to merge layered UI Elements at runtime into fewer Elements and batches. If you need to create a large List or Grid view, such as an inventory screen with hundreds of items, consider reusing a smaller pool of UI Elements rather than a single UI Element for each item.
Pooling
If your game / application uses Lists or Grid with a lot of elements - there is no point in keeping them in memory and in a hierarchy all - for this use pools and when scrolling / getting the next page of elements - update them.

You will dirty the old hierarchy once, but once you reparent it, you’ll avoid dirtying the old hierarchy a second time – and you won’t dirty the new hierarchy at all. If you’re removing an object from the pool, reparent it first, update your data, and then enable it.
Thus, for example, having 500 elements to draw, we use only 5 pieces for real drawing and when scrolling, we rearrange the pool elements so that we draw new elements in already created UI containers.
Animators and Animations
Animators will dirty their UI Elements on every frame, even if the value in the animation does not change. Only put animators on dynamic UI Elements that always change. For Elements that rarely change or that change temporarily in response to events, write your own code or use a tweening system (like DOTween).
Loading and Binding at Fly
If you have some Views that are supposedly rarely called on the stage - do not load them into memory at once - use dynamic loading, for example with Addressable. This way you dynamically manage memory and, as a bonus, you can load heavy View directly from your server on the Internet.
Interaction with objects and data
When creating any game - in it, your entities always have to interact in some way, regardless of the goals - whether it's displaying a health bar to a player or buying an item from a merchant - it all requires some architecture to communicate between the entities.
In order for us not to have to update the data every frame, and in general not to know where we should get it from, it's best to use event containers and similar patterns. I recommend using the PubSub pattern for simple event synchronization combined with reactive fields.
You can read more about this in my previous article.
In conclusion
Of course, these are not all optimization tips, they also include many approaches to general code optimization. A very important point is also planning the architecture of interaction with your interface.
Also you can read official unity optimization guide here.
I will always be glad to help you with optimization tips or any other Unity questions - check out my Discord.


